And... we're back! After struggling through the first trimester, (yes, I'm pregnant with baby #2!) I'm finally back to cooking. Though my sciatic was killing me by the end of dinner AND dessert preparation - it felt so good to be back in the kitchen! And creating a new recipe to boot. Love it. Baby is doing a happy dance too.
Ranch Chicken
1.5 lbs chicken, chopped to bite size (about 1" squares)
2 T olive oil
In bowl or gallon zip-top bag combine:
1 packet ranch seasoning
1 T corn starch
1 T parsley flakes
1 t dill weed
1 t onion powder
1 t salt
1/2 t garlic powder
1/4 t ground pepper
I use a non-stick wok for cooking dishes like these. I love the wok because you can cook lots of food very rapidly. I use it for most of my chicken recipes and recommend investing in one. Pick up a non-stick version, and grab a set of bamboo tools while you're at it. That angled spatula will be your go-to for the wok. This is now my second and I've never spent over $30- so even an inexpensive one should last you 5-7 years. Well worth it to be able to cook chicken in 14 minutes!
Okay - enough about the wok. Because, you can make this in a traditional pan - just select a big enough pan that you give the pieces plenty of surface room so they can brown up.
Toss chicken in spice mix.
Preheat olive oil on high. Add chicken and toss to coat, then let sit until browned. This will happen pretty fast due to the corn starch in this recipe, so keep close watch. Stir with a downward thrust into the middle of the pan, shifting the bottom pieces up to the side, and the side pieces down to the bottom. Allow to brown again, then stir again (same motion). Once you've reached the browning that you want, just keep stirring.
With the heat on high, you don't want to let it sit very long in one place or it will burn. If you will not be able to give this pan your attention for 10 solid minutes, you should give your active time to browning and then turn the heat down to medium to continue cooking. It will just take longer. I like to check the doneness of my chicken by cutting a piece in half with my spatula. If it breaks quickly and the juices run clear, it's done. If I have to really push to get it to cut, or if the juices are still pink/red, it needs more time.
I served this over mashed red potatoes, broccoli, and some fresh pineapple I snagged on sale! We had enough for dinner and lunch, since the potatoes also helped to fill our tummies.
==
For dessert we had chocolate cupcakes with vanilla italian meringue buttercream. I'm a big fan of the easier preparation on the italian version, but I like the slightly denser texture of the swiss meringue buttercream. (Read: I could make myself sick on frosting shots. This from the girl who will scrape traditional buttercream frosting off a cake to avoid it. I'm a frosting snob. Sigh).
If you've never made a meringue buttercream, I highly recommend it - assuming you have access to a stand mixer, it is well worth the effort. HERE is the recipe I used for the italian version. The swiss is out of my Joy of Cooking cookbook. I used a chocolate cake mix, and added 1 T cocoa powder and 1 t vanilla. Because you can't go wrong with extra chocolate and vanilla.
Tuesday, September 3, 2013
Tuesday, July 2, 2013
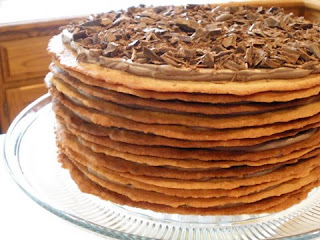
Chocolate Cinnamon Torte
This is my Father in Law's favorite dessert. Ever. It is what my Mother in Law or I make for his birthday each year.
It's a labor of love to make, but worth every oooh and aaaah when you present it. And one of those desserts that has you rolling the bite around on your tongue and rolling your eyes back in your head lingering in the taste.
Chocolate Cinnamon Torte
2 c sugar
1-1/2 c salted butter, softened
2 eggs
1 t vanilla extract
1-1/2 t ground cinnamon
2-2/3 c all-purpose flour
3 oz semi-sweet chocolate
4 c heavy or whipping cream
1/2 c cocoa
Up
to 3 days ahead:
1.
Tear
14 sheets parchment paper, each about 10” long. On reverse of each sheet, trace
pie pan or bottom of 9” cake pan.
2.
Into
large bowl or Cuisinart measure sugar, butter, eggs & vanilla. Combine and whip, do not liquefy. Add
cinnamon and 2 cups flour, beat about 3 minutes or until fluffy, occasionally
scraping bowl. With spoon, stir in
remaining flour to make a soft dough.
3.
Preheat
oven to 375F.
4.
With
frosting spatula, spread a scant 1/3 c dough in a very thin layer onto each
circle. I hold the sheet up to light to see if there are any thick/thin spots. Use ends of parchment to lift on
to a cookie sheet. Bake 7-9 minutes or until lightly browned around the edges.
5.
Remove
cookie to wire rack using ends of parchment, allow to cool. Cut excess
parchment from cookie, about a 1” margin.
6.
Repeat
until all dough is baked. Stack cooled cookies carefully on a flat plate; cover
with plastic wrap and store in cool, dry place.
Early
in the day or day ahead:
1.
Coarsely
grate chocolate; set aside.
2.
In
large bowl with mixer at medium speed, beat cream and cocoa until soft peaks
form.
3.
Carefully
peel paper from one cookie. Place a
small dollop of whip in middle bottom of cake plate (this will keep the cake
from sliding). Place cookie on top.
4.
Spread
with 1/2 c whipped mixture (measure so you don't run out). Repeat
layering until all cookies are used, ending with whipped mixture on top.
5. Pile
grated chocolate on top of cake; refrigerate until serving time, or at least 3
hours before serving so cookies soften for easier cutting. Makes 16 super rich servings.
Alternate:
Make 2-3” cookies and assemble individual size cakes.
Recipe adapted from a tattered copy clipped from BH&G by my Mother in Law 20+ years ago.
Monday, July 1, 2013
Blueberry Picking!
Have you ever been to a pick-your-own blueberry patch? Neither had we until 2 weekends ago when I ventured out with a friend. Packed up the kiddos and made the short drive just outside of town, about 35 minutes.
We were greeted by a friendly gal, later introduced as a neighbor who helps out when they're short handed, who gave us instructions: You'll walk out to these markers. The farther back you go in the row, the better the picking gets. When you pick, pull up, not down on the plant. And, pick only the bluest of blueberries; not green, not crimson, blue with a little white haze on them. That's how you know they're good. And if you need to taste a few to make sure you're on the right track -wink-wink- that's allowed.
Well, the 2 year old with us took that tasting part to heart - we are quite sure he ate half his weight in berries while the rest of us picked. Thankfully they know that's going to happen and had no problem with his berry-stained paws! All our fellow pickers were really friendly too.
Have you ever tasted a blueberry right off the bush? It's the most amazing thing. Ever. We will be doing this every year. A tradition that starts now.
After we had enough in our buckets, and the kids were beginning to complain about thirst and heat we went up to the little store and enjoyed popsicles and cold drinks and were regaled with a whole host of blueberry items - blueberry honey, preserves, lemonade, muffins (of course). I picked just over 2 pounds and my friend just under - and we walked away for a total, get this, under $13. Even the snacks only came up to about $5! How can you beat that for an inexpensive, delicious, get the kids out in nature, outing!? She was making a pie. I made blueberry pancakes the next morning. And we've been enjoying and sharing our prize pickings. Such a treat.
Thanks so much for the hospitality of The Berry Patch, we will never look at blueberries the same way again!
Friday, April 19, 2013
Easy Rustic Italian Bread
This recipe comes from Stan's Aunt Melodee and her fiance David. They came for a visit and this was their contribution to the family dinner - it is crave-worthy, crusty and chewy, and oh-so-unbelievably easy!! I asked if I could share this recipe and they agreed. So grateful to them, for all their help (and for this awesome recipe).
First off, you'll need some hardware - a dutch oven, cast iron or stoneware. Enameled cast iron is their preference, but they borrowed my Pampered Chef "magic pot", aka Deep Dish Covered Baker. It worked great. We'll be working with some high temps, so do check use instructions on your pot first. If you have to reduce temps, increase bake time 5-10 minutes in each step.
Then, you'll need to plan ahead. There's no kneading, or pounding... but you will have to give the yeast time to do its magic. Mix up the sponge, or dough, a day ahead (18 hours). So think of this as a "before you go to bed, and when you get home from school/work the next day", kind of adventure.
Ready?!
Rustic Italian Bread
30 oz (approx. 6 cups) flour, I used whole wheat and increased the water by 2 T)
1/2 t yeast
1-1/2 t salt
3 c water
1 T cornmeal
1 T flour
Mix dry ingredients in a large bowl. Pour in water and stir to mix. Cover with plastic wrap or a kitchen towel and let sit on counter overnight, or 18 hours.
To Bake:
Put dutch oven, with lid, in oven and preheat to 450F for 30 minutes. Just before the 30 minutes are up, put a little flour on the counter and dump the sponge/dough out onto it. Fold all four sides into the center, use a large spatula or dough scraper if you need to. Carefully take the dutch oven out of the hot oven, sprinkle cornmeal on the bottom.
Pick up the sponge and plop it down into the hot dutch oven. Yes, plop. Do a happy dance that you didn't have to knead dough. Put the lid on and return it to the oven. After 30 minutes, remove the lid. Continue baking for an additional 30 minutes at 450F.
The bread should be nice and toasty brown with a total cook time of about an hour.
Let cool for a few minutes then take out and put on a cooling rack. Allow to cool on rack (if you can bear to wait that long before digging in). Slice and enjoy! We had ours with a little butter and honey.
-- Sponge Cryostasis --
If, for some reason, you can't get to baking the sponge in the proper time, seal the bowl well with plastic wrap and put it in the fridge for up to 12 hours. Return the sponge to room temperature before baking as directed above.
Wednesday, April 17, 2013
Blue Tape in the Kitchen
I keep a roll of low-tack painters tape in the kitchen. It's used for everything from sealing misbehav'n boxes (below, with a little tab-handle) to labeling food I'll share with others. I have been known to tape a recipe to the cupboard door for easy reading, and it doesn't damage the walls when displaying kid's artwork.
So... Do you use "blue tape" around the house? I can't imagine my kitchen without it.
Sunday, March 17, 2013
Buttermilk
Never have buttermilk on hand when you need it?
This is one of my favorite things. Yes, you could add vinegar to regular milk, but then you would have to have milk on hand. This way, you just add powdered buttermilk to your dry ingredients and water to your wet, as instructed.
Happy, happy day!
Subscribe to:
Posts (Atom)