Monday, December 11, 2023

Parmesan Drop Biscuits

 These come together so quick and are a fan-favorite addition to a weeknight meal.  They can be baked alone, on a cookie sheet, or used as savory dumplings.  


Parmesan Drop Biscuits

Preheat oven to 400*F

Makes 12-14 biscuits using a standard muffin scoop. 


DRY:

2 c all purpose flour

1 T baking powder

1/2 cup butter, finely chopped/cut in

1 T Italian seasoning blend

1 t salt

1 t garlic powder

WET:

1-1/4 c milk

1 egg

1 c parmesan cheese

(optional) 2 Tablespoons pesto (I freeze Besto Pesto in ice cubes trays each summer for use all year - I just pull them out to thaw when I start making this recipe)  


BRUSH ON at 12 MINUTES:

4T salted butter

1/2 t garlic powder


Line cookie sheet with parchment paper.  Prepare wet and dry ingredients.  

Combine wet and dry and use muffin scoop to place on cookie sheet.  

Bake for 12 minutes, then brush on garlic butter mixture and bake for another 5-8 minutes until golden brown. 

Serve hot.  Store any leftovers in airtight container. 

Saturday, April 11, 2020

The BEST pulled pork tacos

The BEST pulled pork tacos

Bonus: They're also crazy easy!  

You'll need:
3 lb pork roast, this is pretty forgiving - I usually get my hands on a shoulder... I'm confident that whatever you have on hand will suffice.
1 16 oz jar Herdez Mild Verde Salsa
1 tsp cumin
1 tsp granulated garlic
dash each salt and pepper

To serve:
corn tortillas, 3-5 per person
diced tomatoes
diced cilantro
crumbled Cotija cheese

Hardware:
Crock pot
1 large or two smaller cookie sheets
Broiler oven

Pour a little of the salsa in the bottom of your crock pot, place the roast on top, then cover with remainder of salsa.  Sprinkle spices over the top and cook.  4-5 hours on high, 6-8 on low.  Use a thermometer to make sure you're at or above 145F in the middle.

Once the roast is cooked, use two forks to shred it.  Return shredded pork to crock pot and stir it around in the sauce.  Use tongs or a large slotted spoon to move shredded pork to cookie sheet in a nice single layer.  You'll leave a good portion of the liquid behind in the crock pot, that's ok. 

Broil shredded pork on high for 5-7 minutes or until dark and crispy on the edges - just shy of burning, so watch closely!  This creates magic, caramelizing the sauce and the meat together into savory "meat candy".  It's practically irresistible.  I like to use two cookie sheets so that I can start building tacos while the second is in the oven. 

This will serve our hungry family of 4 two meals, generally dinner and lunch.  I like to make cilantro lime rice and a green salad to serve on the side. 

Huge thanks to Erin Woodward who taught me the value of broiling this dish and introducing our family to "meat candy". 


Sunday, March 29, 2020

Apple Hand Pies with Cream Cheese Crust

This might be my new favorite crust.  The dough itself was easy to make, and it worked up so nicely - especially for the cutest little apple hand pies.  It's sturdier than the butter and oil version I usually make and oh. so. tasty! 

I used my favorite apple pie filling recipe too.  Because you cook the apples in advance, it doesn't juice and shrink while baking so it's a lot more stable.  If you have The All New, All Purpose, Joy of Cooking book, it's the "Apple Pie II" recipe.  Copied below for your easy reference.   

I made the dough in my stand mixer the night before.  It took about an hour out of the fridge to be soft enough to work, so plan ahead.

Cream Cheese Pie Crust

This would make one two-crust pie or 16 hand pies with an older model Pampered Chef cut-n-seal tool HERE.

Combine in stand mixer bowl:
2-1/4 cups all purpose flour
1/4 cup powdered sugar (or 2 Tablespoons of granulated white sugar)
1/2 tsp salt
 
Cut into 1/2" pieces and add while mixing on low speed:
12 Tablespoons (1-1/2 sticks) cold unsalted butter
6 ounces cold cream cheese

This should look like sand with some pea-sized clumps in it. 

Drizzle in:
3-6 Tablespoons cold heavy cream (I used half and half because it's what I had, you could probably get away with ice water in a pinch.)

This should start to form a dough.  Remove from mixer, press into a flat round disk about an inch thick.  Wrap in plastic wrap and store in the fridge.  You'll want to chill it at least 1 hour, or a day or two.  Cold fat is happy fat when it comes to pie crust, so you don't want it to get warm and goopy. 

Apple Pie Filling

This recipe is enough for a whole pie, so you'll have lots of leftovers if you're making hand pies.  (Do a happy dance and put it on ice cream. You're welcome.) 

3 pounds golden delicious apples (6-8 medium-large), peeled and sliced 1/8-1/4" thick.  This is going to start to sound like a Pampered Chef commercial, but we really do love our peeler-corer-slicer.  It's great for applesauce prep work too! 

With 8 cups of prepared apples, in the biggest skillet you have on high heat, melt until sizzling and fragrant:
3 Tablespoons unsalted butter

Add the apples and toss to coat.  Reduce heat to medium and cover to keep the juices in, stirring frequently, until softened but still slightly crunchy, about 5 minutes.  Stir in:
3/4 cups sugar (more or less depending on the apples)
1/2 tsp cinnamon
1/8 tsp salt
Increase heat to high and stir, stir, stir... until the juices are thick and bubbly.  3-5 minutes.  Immediately pour the apples out onto a cookie sheet and let cool to room temp.  This is now ready to use in your pies!  You can also store this in the fridge until you're ready to use it/eat it. 


Assembling the Hand Pies

On a well floured surface, roll the dough out to 1/8" thickness and cut your rounds.  You'll need two rounds for each hand pie, so re-roll the scraps until you have used up all the dough and have an even number of rounds. 

Put your filling in the middle, as much as you can fit while still leaving space for the crimping around the edges.  Wet the edges of the bottom crust with water.
Slightly stretch another round and loosely match it up with the bottom layer.  Using the cut-n-seal or a fork, crimp the edges together.  Move to lined cookie sheet.  Cut 3-4 small vent holes using the tip of a sharp knife.

Milk Wash:
I used a half and half and maple syrup wash (2 T half and half, 1 t maple syrup), then sprinkled some maple sugar on top.  You could do an egg wash, or no wash.  Learn more about what each will do for you over at Epicurious

Bake at 375F for 20-25 minutes or until lightly golden. 


Monday, July 11, 2016

The BEST blueberry breakfast cake. Ever.

It's not mine, but I'm sharing and adding my notes for y'all's benefit.

Seriously delicious and crazy easy, Alexandra knocks it out of the park!  Head on over to her blog to see the recipe in all its glory.


AlexandraCooks.com | Buttermilk Blueberry Breakfast Cake
https://www.alexandracooks.com/2011/06/29/buttermilk-blueberry-breakfast-cake/

When I don't have a fresh lemon to zest, I add 3 drops of lemon essential oil.  I think there's true magic in creaming the lemon oils (from zest or EO) with the fat of the butter - it infuses that light freshness through the entire recipe and compliments the blueberries perfectly.

I use frozen berries when I don't have fresh, I just let them thaw a bit on the counter while I'm preparing the rest - then toss with flour as directed.  (That little step keeps them from all sinking to the bottom!)

Sometimes, I make these into muffins, using If You Care large baking cups (LOVE @If_You_Care). I preheat the oven to 350F then take it down to 325F once I pop the pans in.  They take about 25-30 minutes, but start checking at 20.  You can use a toothpick to test done-ness as they won't necessarily brown a bunch.

And don't skip the sugar sprinkle on top.  They're not the same without!

Happy Blueberry Month!

Thursday, July 7, 2016

Sweet and Zesty Sesame Chicken

If you aren't familiar with the website epicurious.com yet, you should take this moment to go explore.  They are part of publishing groups like Gourmet, Bon Appetit, and more. So, they draw from lots of great, vetted recipe sources. The inspiration for this recipe came from their "inspiration" email "Not Your Mother's Chicken Skewers."  Of course, I couldn't actually follow their recipe... of course.  Kebabs sounded really interesting, but it was so blazing hot outsize, I couldn't touch the grill with bare hands.  Nix that.  Wok in the comfort of my air-conditioned kitchen! Win!

I started 2 cups of rice in the steamer...

Sweet and Zesty Sesame Chicken


2 lbs chicken, cut into bite size pieces
2 T oil for wok, I used coconut - olive is my other go-to

In small bowl, combine and set aside:
  1 T corn starch
  3 T cool water

Sauce:
Stir together in bowl or measuring cup and set aside.
  1/2 c dark brown sugar
  1/2 c cooking wine (sweet but dry)
  1/2 c light soy sauce
  1/4 c rice vinegar

Sprinkle:
Mix together and set aside (refrigerate any unused since it's not completely dry).
  4 T roasted sesame seeds (you can find these in large quantity, pre-roasted at your local asian foods
  market - much better value than the supermarket)
  2 T parsley, chopped fine
  Zest of 1 medium lemon, about 2 tsp.
  1/2 t red pepper flakes, I used the ones Stan keeps on hand for pizza and picked out the seeds
Mix together and set aside (refrigerate any unused since it's not completely dry).

Heat oil in wok over high heat. When hot, add chicken all at once and toss to coat in oil.  A bamboo spatula with a long handle is really nice about now.  Stir again every minute or two for 10 minutes, you might see a little color on a few pieces. Add sauce and let simmer to finish cooking chicken, about 5 minutes.  Stir in corn starch mixture, return to boil, then reduce heat to low.

Serve over rice, sprinkle with sesame mix. We had a simple green salad to round out the meal.

For the kids plates, I used wooden skewers to pick up 6-8 pieces of chicken to serve.  It was a big hit.  They both cleaned their plates and wanted more!


 Inspired by: http://www.epicurious.com/recipes/food/views/soy-sauce-chicken-kebabs-with-sesame-lemon-sprinkle

Sunday, June 26, 2016

Creamy Jalapeno Dip

If you've ever been to Chuy's, and have functioning tastebuds, you know how imperative it was to our budget to figure out the copy cat recipe for their Creamy Jalapeno Dip!  This is dip, salad dressing, or a quick addition to rice for a crazy-awesome side dish.  It goes on tacos, and chicken, and steak, and in my mouth.  Stan stops just shy of drinking it straight. Cora takes it in a bowl and laps it up with her fingers, occasionally adding a chip.

Creamy Jalapeno Dip

5-7 medium jalapenos, seeded
2 small bunches cilantro
1 c buttermilk
3 c mayonnaise
1 tsp crushed garlic
1/2 t salt
1 packet ranch dressing mix

Toss it all in the food processor and blend, blend, blend.  Serve chilled with chips and veggies for dipping. Keep refrigerated.  I'd like to tell you how long it keeps in the fridge, but it never lasts that long around here.  Best guess 3 days, longer depending on how fresh your ingredients were.
(Best practice for longevity -of any dip- is to pour servings each time so you're not risking contamination of the whole recipe when you eat... you know who you are, you double dippers, you.)


Friday, December 11, 2015

Carrot Cake Cookies with Allspice Orange Cream Cheese Filling


Carrot Cake Cookies
Preheat oven to 350F
Line cookie sheets with parchment paper.
Ready cooling racks.

Cream together:
1/2 c butter, unsalted (if using salted, omit salt in dry ingredients)
1/2 c dark brown sugar
1/2 c granulated sugar
1 lg. egg
1 T vanilla

Whisk together, then combing with butter mix:
1-1/2 c flour
1/2 tsp baking soda
1/4 tsp baking powder
1-1/2 tsp cinnamon
1/2 tsp nutmeg
1/2 tsp salt (omit if using salted butter)

Mix into dough:
1-1/2 c grated carrots
20oz can crushed pineapple in pineapple juice, drained well (and I mean well, pick it up and wring it out with your hands, well.)
1 c walnuts, chopped

I used a cookie scoop (approx. 1 Tablespoon) and flattened the top of the cookies slightly before baking.  There are so many goodies in this dough, that it doesn't spread much on it's own.  We're going to help it out a little so you can still wrap your mouth around the finished sandwich.

Bake 10-12 minutes, or until just golden brown on the bottom.  I could see the top middle of each cookie change gloss, like when you're watching pancakes to flip.

Let rest 1 minute on the cookie sheet, then remove to cooling rack.  These are very cake-like, so you don't want them to steam on the cookie sheet, they'll stick.

I made the cookies the night before and kept them loosely covered.  Too tightly covered and they'll get all sticky.  It's at this point that I'm sure you could freeze them, to thaw and frost later - but I haven't been intentional enough to have extras to freeze.


Allspice Orange Filling

8oz cream cheese, softened
2 T powdered sugar
1 tsp ground allspice
1 tsp vanilla
1-2 tsp orange juice
2 drops orange essential oil
*I LOVE using essential oils in cooking.  Because they're lipo-soluble, they blend in with the butter or oil and infuse the entire dish with amazing flavor.  Citrus oils are pressed from the rind, so you get the same flavor as zest, without having to have the fresh fruit on hand.  And, there's the long list of health benefits pure essential oils bring to the table - bonus!*

Whip together.  I used the paddle on high in my stand mixer.  Fill a piping bag or spread with a knife, and make sandwiches!  Store in the fridge and eat within 1-2 days.

(I highly recommend making a double batch of frosting and dipping graham crackers in it once you've run out of cookies...)


Wednesday, September 23, 2015

Coconut Lime Rice Pudding

I love rice, and I love creaminess (that's a word, right), and I have a serious sweet tooth - so I love rice pudding (when it doesn't involve raisins... eew...)  Me, and my husband, and my kids... we all love this rice pudding.  And not just in the winter, oh no, it's super yummy cold in the summer!

You'll want coconut milk from the can, sometimes also labeled coconut cream - but not the coconut cream you find next to the mixed drink stuff.  You're hunting in the "ethnic foods" aisle.  I use Botan Calrose rice.  It's delicate and slightly sweet and I love it.  I buy it in 10lb bags from Amazon Prime. I'm serious about my rice.  Sugar is easy - use whatever you like.  Granulated, brown... I've even catered to a diabetic and made it with Splenda (that's love).  It's a seriously easy and very forgiving recipe, so don't feel like you have to have every single last thing done perfectly.  Just don't scorch the bottom... that I can't help you with. (sigh)  I hope that you'll make it the first time as written, and then start experimenting.  It's perfect for when you have rice leftover from the night before (even if you have to guess how much milk you need).  You don't have all the milk in coconut? Ok, substitute dairy, rice, almond milk (it's really good all almond milk too, just increase vanilla to a full tsp and omit the lime).  Not a fan of lime? Try adding dried cranberries, blueberries and golden raisins instead.  Or, just sprinkle cinnamon or nutmeg over the top. Dig around in the pantry and get creative!

But, I mean, really... "You put the lime in the coconut..." they didn't write a song about it because it's icky. Right? Right!

Bonus points... This also fits the bill when you're in need of a dessert that's dairy and gluten free (and nut and corn, BTW)! Tootle on over to my Microwave Peanut Brittle for another dairy-free dessert option. 

Maybe now you're beginning to see why I love this recipe so.  I hope it becomes one of your go-to treats as well!

Coconut Lime Rice Pudding

1-1/3 cups rice, cooked according to package directions (I use an electric rice steamer.)
3 cans (about 5 cups) coconut milk/cream
1/2 c sugar
1/2 tsp vanilla
3 drops lime essential oil
zest of one lime, finely grated

Combine cooked rice, milk and sugar in a heavy-bottom medium pot.  Cook over medium heat, uncovered, for about 30 minutes.   I try to give it a stir every 5 minutes when cooking at medium heat, stirring constantly the last couple minutes.  You can drop the temp to medium-low and stir less often, it'll just take longer.  You'll know that it's done when it gets to "molten lava" stage.  Remove from heat, stir in vanilla, lime essential oil, and lime zest.  We add these after it's off the heat so the flavor doesn't just evaporate.

You can then pour it into individual cups, or stow it in one big covered bowl. Either way, you'll want to cover the surface with plastic wrap or parchment paper cut to fit the top surface (this keeps it from getting that icky skin).  And let it cool a while on the counter top before sliding it into the fridge.

Serve warm or cold.  Get fancy and use an ice cream scoop to serve in individual dishes with another sprinkle of lime zest and some whipped cream.  Or less fancy- in a plain bowl, curled up on the couch watching NCIS reruns with my hubs... Or is that just me?

*** Giveaway ***
And, because I love it so much (and I love you so much) I'm giving away a bottle of my favorite lime essential oil.  Tell me how you use essential oils when you cook.  Just comment on this blog post to enter. I'll draw a winner after noon CST on Wednesday, Sept. 30th.  Y'all, this is my first giveaway and I'm pretty stinking excited about it!  So please, share this with your friends.
http://www.mydoterra.com/tracynice/#/

Thursday, April 9, 2015

Honey Oatmeal Bread

*** UPDATED ***

So, I was a little over zealous in sharing this win with you. It was so good fresh out of the oven.  A little dense, but yummy for sandwiches the next day.  But today... oh, boy.  It's turned in to a brick.  A beautiful brick, but a brick nonetheless.  *sigh*  I think it's because it uses butter instead of oil.  

I'm very sorry if any of you ran out there and whipped this up, only to be disappointed that I'd lead you astray on this one.  I'm feeling rather sad myself, really hoping I'd accomplished this rare feat - lovely, yummy, home made bread.  So... the search continues.  I will keep you posted, and please share with me in comments if you have a tried and true recipe I should give a whirl.   For now, I'm going to scratch this one off my list.  

Tracy


I have a confession to make.  I am working to overcome my fear of making yeast bread.  It's an irrational fear, considering that when I was a teenager I won medals at the county level with my challah bread... but, you know, that was years ago. And my memory? Not so hot.

As adventurous as I usually am in the kitchen, it seems a little embarrassing.

I'm also trying to downsize our "stuff", so, as Alton Brown would put it "single taskers need not apply".  I LOVE my KitchenAid stand mixer.  It is red.  I love red.  It is a gift from my in-laws.  I love my in-laws.  I usually make things like mashed potatoes or marshmallows in it (or cookie dough, or frosting...)  But a while back, while coaching me through cinnamon rolls, Aunt Mel showed me how to use the dough hook and a light bulb went on.  Breadmaker, shbreadmaker - I have a KitchenAid!

I am now also... drum roll please... a stay at home mom.  Really.  And it's amazing.  A little scary too, but amazing.  It's where God has put me. Knowing that, I am doing my very best to rest in Him and embrace my new role.  So today, when we used the last slice of bread, I thought "Tracy, why can't you just make bread".

WHAAA???  Crazy talk.  Good crazy.

Yeah, so a couple minutes on Google, a half dozen recipes critiqued, and one conglomerate emerged.  My bread.  Crusty on the outside, soft on the inside, with honey and oats.  I hope you enjoy it too!

Honey Oatmeal Bread
Makes 2 loaves.

Preheat oven to 350F, grease 2 standard loaf pans.
(I have one glass and one non-stick and they both worked great.)

1-1/2 c water
1/2 c honey
1/2 c unsalted butter (if using salted butter adjust salt)

5 to 6 c all purpose flour
1 c quick cooking oats
3 tsp salt (reduce to 2 if using salted butter)
2 T dry active yeast or (2) 1/4oz packets

3 eggs, one separated

1 T water
oatmeal to sprinkle on top

In small saucepan, combine water, honey and butter - bring to 120F (this is the right temp to feed your yeast).  While this is warming, combine dry ingredients in stand mixer bowl.

Mix on speed 2 while gradually adding warm wet ingredients.  Next add 2 eggs and 1 egg yolk (reserve white to brush the top).

Continue on speed 2 while adding remaining flour, 1/3 cup at a time, until the dough clings to hook and sides of the bowl are clean.  The amount of flour can vary depending on many things, I ended up using a total 6 cups.  Knead 2 minutes.

Put dough in greased bowl to rise.  I sprayed olive oil in a large glass bowl (about the same size as my stand mixer bowl) and put the dough in, then turned it over so the top and bottom got some oil on them.  Drape a clean kitchen towel over the bowl, and set it somewhere warm and dark.  I put it on the counter next to the fridge.  The motor from the fridge creates a warm draft on one side, so I took advantage of that.  Set your kitchen timer for 1 hour and walk away.

Flour a small patch of counter top.  Pour the dough out, push it around a little (get bossy) and pinch in the middle to make two loaves.  Shape them a little and put any rough edges on the bottom of your loaf.  Place in greased loaf pans and drape with clean kitchen towel.  Set aside for 20 minutes or so.  This is your second rise.  They'll rise more as they cook too.

Add 1 T water to reserved egg white and brush on to tops of loaves.  Sprinkle with oats (Cora got to help with this step).  Bake for 40 minutes at 350F.  Remove from oven and turn out onto cooling rack.  I immediately cut the heel off one, poured some milk, and Cora and I quite enjoyed ourselves.

I hope you'll try this in your home.  Turns out, baking bread isn't all that scary!!  


Monday, April 6, 2015

Easy Cranberry Bread

Ever stared blankly into your pantry wondering what you'll use to make... something... Hoping, maybe, that you'll find a new use for a tried and true pantry staple?  I have two words for you.

Cranberry sauce.

Not just for Thanksgiving, it also makes AMAZING sauce for tangy cranberry meatballs.  And, as luck would have it, quick bread!!  There's something so magical about baking yummy food without a special shopping list or trip to the store.  So here it is.  I scoured the interwebs, read dozens of recipes... and made one that we're keeping.  When I asked Stan if he liked it, he suggested it go on the blog.  We have a winner!!

Easy Cranberry Bread

Preheat oven to 325F, grease bottom of loaf pan.

2 c all purpose flour
1 T baking powder
1 tsp cinnamon
1/2 tsp nutmeg
1/2 c butter, softened
1/2 c sugar
2 eggs
1 can whole berry cranberry sauce
2 drops Wild Orange essential oil (optional)
1 c chopped walnuts

Sift together flour, baking powder and spices. Set aside.

Cream together butter, sugar and essential oil.  Add eggs then cranberry sauce.

Fold in walnuts.

Bake at 325F for 50-60 minutes, or until toothpick comes out clean from center.

Makes 1 medium loaf.  Store covered at room temp for about 5 days (if it lasts that long).

Tuesday, February 17, 2015

Turkey Meatloaf Muffins

I'm just going to come out and confess:  I created these out of desperation.

Cora wants to feed herself now, which is great... except for the fact that she has a whole whopping 6 teeth - none of which are molars and she can't effectively use a fork or spoon.  So, when I went searching for "easy toddler foods" and meatloaf popped up, I was inspired!  Stan does not like traditional meatloaf, so I knew I had to get creative if it would be a successful family meal.  I dug out my Joy of Cooking book and read the section on meatloaf.  I used quick cooking oats instead of bread crumbs and followed their suggestions for how much meat/wet/dry ingredients.  Then I tossed them in muffin liners for a fast weeknight meal - only 20 minutes cook time!

These are a HUGE success.  Not only does Cora love them, but so does the rest of the family.  Win!!!  They are savory, with the rosemary and sweet, with the cherries.  Like the perfect bite of Thanksgiving dinner. Hope you enjoy them just as much as we do.

Mini Turkey Meatloaf 


Makes approx. 20, Serving = 3 (adult)

2 lb ground turkey
3 large eggs, beaten
1 c cherry preserves, 1/4 c reserved.
1 c quick cooking oats
3/4 c sliced almonds
1 tsp dried parsley
1 tsp salt
1/2 tsp ground black pepper
1/4 tsp dried rosemary
dash dried ground mustard

Mix just until blended.  Line muffin pans with liners or spray with oil.  Fill muffins (I used a large ice cream scoop) and bake at 350F for 20 minutes, or until thermometer reads 180F internal temp. Remove and brush with reserved cherry preserves.

Serve hot with some roasted sweet potatoes and peas, and you're in business.

Happy baby! She ate a whole muffin in one sitting with a handful of frozen peas.  (And yes, that's a fork in her hand... she has to hold one so she's just like us!)


Tuesday, September 3, 2013

Ranch Chicken

And... we're back!  After struggling through the first trimester, (yes, I'm pregnant with baby #2!) I'm finally back to cooking.  Though my sciatic was killing me by the end of dinner AND dessert preparation - it felt so good to be back in the kitchen!  And creating a new recipe to boot.  Love it.  Baby is doing a happy dance too.

Ranch Chicken

1.5 lbs chicken, chopped to bite size (about 1" squares)
2 T olive oil

In bowl or gallon zip-top bag combine:
1 packet ranch seasoning
1 T corn starch
1 T parsley flakes
1 t dill weed
1 t onion powder
1 t salt
1/2 t garlic powder
1/4 t ground pepper

I use a non-stick wok for cooking dishes like these.  I love the wok because you can cook lots of food very rapidly.  I use it for most of my chicken recipes and recommend investing in one.  Pick up a non-stick version, and grab a set of bamboo tools while you're at it.  That angled spatula will be your go-to for the wok.  This is now my second and I've never spent over $30- so even an inexpensive one should last you 5-7 years.  Well worth it to be able to cook chicken in 14 minutes!

Okay - enough about the wok.  Because, you can make this in a traditional pan - just select a big enough pan that you give the pieces plenty of surface room so they can brown up.

Toss chicken in spice mix.

Preheat olive oil on high.  Add chicken and toss to coat, then let sit until browned. This will happen pretty fast due to the corn starch in this recipe, so keep close watch. Stir with a downward thrust into the middle of the pan, shifting the bottom pieces up to the side, and the side pieces down to the bottom.  Allow to brown again, then stir again (same motion).  Once you've reached the browning that you want, just keep stirring.

With the heat on high, you don't want to let it sit very long in one place or it will burn.  If you will not be able to give this pan your attention for 10 solid minutes, you should give your active time to browning and then turn the heat down to medium to continue cooking.  It will just take longer.  I like to check the doneness of my chicken by cutting a piece in half with my spatula.  If it breaks quickly and the juices run clear, it's done.  If I have to really push to get it to cut, or if the juices are still pink/red, it needs more time.

I served this over mashed red potatoes, broccoli, and some fresh pineapple I snagged on sale!  We had enough for dinner and lunch, since the potatoes also helped to fill our tummies.  

==
For dessert we had chocolate cupcakes with vanilla italian meringue buttercream.  I'm a big fan of the easier preparation on the italian version, but I like the slightly denser texture of the swiss meringue buttercream.  (Read: I could make myself sick on frosting shots. This from the girl who will scrape traditional buttercream frosting off a cake to avoid it.  I'm a frosting snob. Sigh).
If you've never made a meringue buttercream, I highly recommend it - assuming you have access to a stand mixer, it is well worth the effort.  HERE is the recipe I used for the italian version.  The swiss is out of my Joy of Cooking cookbook.  I used a chocolate cake mix, and added 1 T cocoa powder and 1 t vanilla.  Because you can't go wrong with extra chocolate and vanilla.

Tuesday, July 2, 2013

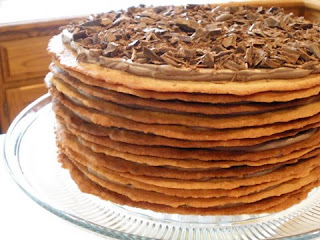
Chocolate Cinnamon Torte


This is my Father in Law's favorite dessert. Ever.  It is what my Mother in Law or I make for his birthday each year.

It's a labor of love to make, but worth every oooh and aaaah when you present it.  And one of those desserts that has you rolling the bite around on your tongue and rolling your eyes back in your head lingering in the taste.

Chocolate Cinnamon Torte
2 c sugar
1-1/2 c salted butter, softened
2 eggs
1 t vanilla extract
1-1/2 t ground cinnamon
2-2/3 c all-purpose flour

3 oz semi-sweet chocolate
4 c heavy or whipping cream
1/2 c cocoa


Up to 3 days ahead:
1.      Tear 14 sheets parchment paper, each about 10” long. On reverse of each sheet, trace pie pan or bottom of 9” cake pan.
2.      Into large bowl or Cuisinart measure sugar, butter, eggs & vanilla.  Combine and whip, do not liquefy. Add cinnamon and 2 cups flour, beat about 3 minutes or until fluffy, occasionally scraping bowl.  With spoon, stir in remaining flour to make a soft dough.
3.      Preheat oven to 375F.
4.      With frosting spatula, spread a scant 1/3 c dough in a very thin layer onto each circle.  I hold the sheet up to light to see if there are any thick/thin spots.  Use ends of parchment to lift on to a cookie sheet.  Bake 7-9 minutes or until lightly browned around the edges.
5.      Remove cookie to wire rack using ends of parchment, allow to cool. Cut excess parchment from cookie, about a 1” margin.
6.      Repeat until all dough is baked. Stack cooled cookies carefully on a flat plate; cover with plastic wrap and store in cool, dry place.

Early in the day or day ahead:
1.      Coarsely grate chocolate; set aside.
2.      In large bowl with mixer at medium speed, beat cream and cocoa until soft peaks form.
3.      Carefully peel paper from one cookie.  Place a small dollop of whip in middle bottom of cake plate (this will keep the cake from sliding).  Place cookie on top.
4.      Spread with 1/2 c whipped mixture (measure so you don't run out).  Repeat layering until all cookies are used, ending with whipped mixture on top.
5.     Pile grated chocolate on top of cake; refrigerate until serving time, or at least 3 hours before serving so cookies soften for easier cutting. Makes 16 super rich servings.


Alternate: Make 2-3” cookies and assemble individual size cakes.

Recipe adapted from a tattered copy clipped from BH&G by my Mother in Law 20+ years ago. 

Monday, July 1, 2013

Blueberry Picking!

Have you ever been to a pick-your-own blueberry patch?  Neither had we until 2 weekends ago when I ventured out with a friend.  Packed up the kiddos and made the short drive just outside of town, about 35 minutes.

We were greeted by a friendly gal, later introduced as a neighbor who helps out when they're short handed, who gave us instructions:  You'll walk out to these markers.  The farther back you go in the row, the better the picking gets.  When you pick, pull up, not down on the plant.  And, pick only the bluest of blueberries; not green, not crimson, blue with a little white haze on them.  That's how you know they're good.  And if you need to taste a few to make sure you're on the right track -wink-wink- that's allowed.

Well, the 2 year old with us took that tasting part to heart - we are quite sure he ate half his weight in berries while the rest of us picked.  Thankfully they know that's going to happen and had no problem with his berry-stained paws!  All our fellow pickers were really friendly too.

Have you ever tasted a blueberry right off the bush?  It's the most amazing thing. Ever.  We will be doing this every year.  A tradition that starts now.

After we had enough in our buckets, and the kids were beginning to complain about thirst and heat we went up to the little store and enjoyed popsicles and cold drinks and were regaled with a whole host of blueberry items - blueberry honey, preserves, lemonade, muffins (of course).  I picked just over 2 pounds and my friend just under - and we walked away for a total, get this, under $13.  Even the snacks only came up to about $5!  How can you beat that for an inexpensive, delicious, get the kids out in nature, outing!?  She was making a pie.  I made blueberry pancakes the next morning.  And we've been enjoying and sharing our prize pickings.  Such a treat.

Thanks so much for the hospitality of The Berry Patch, we will never look at blueberries the same way again!

Friday, April 19, 2013

Easy Rustic Italian Bread

This recipe comes from Stan's Aunt Melodee and her fiance David.  They came for a visit and this was their contribution to the family dinner - it is crave-worthy, crusty and chewy, and oh-so-unbelievably easy!!  I asked if I could share this recipe and they agreed.  So grateful to them, for all their help (and for this awesome recipe).

First off, you'll need some hardware - a dutch oven, cast iron or stoneware.  Enameled cast iron is their preference, but they borrowed my Pampered Chef "magic pot", aka Deep Dish Covered Baker.  It worked great.  We'll be working with some high temps, so do check use instructions on your pot first.  If you have to reduce temps, increase bake time 5-10 minutes in each step.

Then, you'll need to plan ahead.  There's no kneading, or pounding... but you will have to give the yeast time to do its magic.  Mix up the sponge, or dough, a day ahead (18 hours).  So think of this as a "before you go to bed, and when you get home from school/work the next day", kind of adventure.

Ready?!

Rustic Italian Bread

30 oz (approx. 6 cups) flour, I used whole wheat and increased the water by 2 T)
1/2 t yeast
1-1/2 t salt
3 c water

1 T cornmeal
1 T flour

Mix dry ingredients in a large bowl. Pour in water and stir to mix. Cover with plastic wrap or a kitchen towel and let sit on counter overnight, or 18 hours.

To Bake:
Put dutch oven, with lid, in oven and preheat to 450F for 30 minutes.  Just before the 30 minutes are up, put a little flour on the counter and dump the sponge/dough out onto it.  Fold all four sides into the center, use a large spatula or dough scraper if you need to.  Carefully take the dutch oven out of the hot oven, sprinkle cornmeal on the bottom.

Pick up the sponge and plop it down into the hot dutch oven. Yes, plop.  Do a happy dance that you didn't have to knead dough.  Put the lid on and return it to the oven.  After 30 minutes, remove the lid.  Continue baking for an additional 30 minutes at 450F.

The bread should be nice and toasty brown with a total cook time of about an hour.

Let cool for a few minutes then take out and put on a cooling rack. Allow to cool on rack (if you can bear to wait that long before digging in).  Slice and enjoy!  We had ours with a little butter and honey.

-- Sponge Cryostasis --
If, for some reason, you can't get to baking the sponge in the proper time, seal the bowl well with plastic wrap and put it in the fridge for up to 12 hours.  Return the sponge to room temperature before baking as directed above.

Wednesday, April 17, 2013

Blue Tape in the Kitchen

I keep a roll of low-tack painters tape in the kitchen.  It's used for everything from sealing misbehav'n boxes (below, with a little tab-handle) to labeling food I'll share with others.  I have been known to tape a recipe to the cupboard door for easy reading, and it doesn't damage the walls when displaying kid's artwork. 

So... Do you use "blue tape" around the house?  I can't imagine my kitchen without it. 


Sunday, March 17, 2013

Buttermilk

Never have buttermilk on hand when you need it?

This is one of my favorite things. Yes, you could add vinegar to regular milk, but then you would have to have milk on hand. This way, you just add powdered buttermilk to your dry ingredients and water to your wet, as instructed.

Happy, happy day!

Sunday, December 30, 2012

Citrus Salad

This is one of my winter favorites. It is especially wonderful for brunch when there aren't a whole lot of other fresh fruit options available in the grocery store. The segments look like glimmering gems!

Grapefruits, segmented (one per 2 people)
Oranges, segmented (one per person)
Blood orange or ruby red grapefruit, 1-2 for color.

Add to taste:
Honey
Vanilla
Dark Rum (optional, but very yummy)

Mix together in a pretty bowl (not leaded crystal) and serve at room temperature. Store refrigerated.

Friday, December 14, 2012

Lemon Curd

I got this idea from the Krusteaz Gingerbread mix box.  It's a delicious compliment to the bread!

Lemon Curd
1 sm. package instant lemon pudding, prepared according to directions.
1/4 cup water

Prepare pudding according to instruction on box, add water. Serve cold to room temp. with gingerbread.

Saturday, November 24, 2012

Quinoa, Almond and Orange Salad


Quinoa, Almond and Orange Salad

My favorite quinoa recipe to date.  I love the warmth of the cumin and the cool of the parsley.  
1 cup quinoa
1 cup plus 1 T orange juice, divided (can be from concentrate)
2 large oranges, peeled and cut into membrane-free segments (or a large can of drained mandarin oranges)
1 teaspoon orange zest (if you have it)
1/4 cup slivered almonds
1/4 teaspoon ground cumin
1/4 teaspoon ground coriander
1 T olive oil
1/2 teaspoon salt
1/4 cup parsley (or cilantro), chopped
1. Rinse the quinoa in a fine mesh sieve under cold running water (if not pre-rinsed). Drain and combine with 1 cup water and 1 cup orange juice in a saucepan. Bring to a boil; immediately reduce heat, cover and simmer until all the liquid is absorbed, about 15 minutes. (I just toss it all into my rice cooker, works like a charm.)
2. Meanwhile, place the almonds in a dry skillet over medium heat and cook, stirring occasionally, until fragrant and very lightly toasted. Set aside. Mix together 1 T orange juice, olive oil, spices and orange segments.
3. Combine the cooked quinoa, oranges and spices, toasted nuts, dressing and parsley/cilantro and serve warm or at room temperature.
Makes 4 generous servings

Wednesday, November 7, 2012

Ranch Seasoning

If you're like me, you like being able to pronounce the ingredients in your food.  Ranch seasoning without the preservatives (or dairy)!  And we like it better than the brand name.

Ranch Flavor Mix
1/2 c dry buttermilk (optional)
1 T parsley flakes
1 t dill weed
1 t onion powder
1 t salt
1/2 t garlic powder
1/4 t ground pepper

This is equivalent to a single packet, or about 3 T of seasoning.

Enjoy!

Sunday, July 8, 2012

Sweet and Zesty Coleslaw

The sweet of crushed pineapple combined with the zest of horseradish!  After a dinner date at Famous Dave's, my husband made a special request - copy their coleslaw!  My husband, the self-proclaimed coleslaw hater (and horseradish lover), LOVES this recipe.  I hope you do too.

Sweet and Zesty Coleslaw  
1 bag shredded cabbage for coleslaw
1 c shredded carrots
20oz can crushed pineapple, drained
Sauce:
1 c mayo
1/2 c sugar
3 T prepared horseradish (from a jar, with as few ingredients as possible - horseradish, vinegar, water should be about it)
1 t dijon mustard (I like Trader Joe's)
1 t ground white pepper
1/2 t salt
1/2 t celery seed
1/4 t garlic powder

In a large bowl, combine sauce ingredients and blend well.  Stir in cabbage, carrots and pineapple.  Cover and refrigerate at least 30 minutes, stir before serving.  

Serves 10-12.   

Friday, May 18, 2012

Tricky Water

This is how I trick myself into drinking tap water... Yummy citrusy ice cubes.  So fancy, but so easy!

Start by slicing up the citrus of your choice.  I am picky.  Heirloom naval orange are a-mazing.  And when I can't get my hands on some Meyer lemons, organic lemons are the next best thing - sweeter than just any ol' lemon.  Or you can use a whole cranberry, sliced grapes, edible flowers... the options are as varied as your taste. 

Pop that little bit of flavor into an old fashioned ice cube tray. Fill with tap water and freeze.
When the cubes are frozen, put them in a zip top freezer bag and enjoy at your leisure. I like to put 2-3 in my reusable water bottle. I even have a bag stashed in the work freezer!

They're especially fancy with some orange juice and lemon-lime soda in a punch bowl at a party! 


Sunday, May 6, 2012

Mandarin Orange Coffee Cake

I love mandarin oranges!  (They're especially yummy when stowed in the ice chest on a camping trip). So when I had them baked on top of a delicate coffee cake I had to have the recipe.  I snagged this one from a co-worker's wife over a decade ago - and have yet to see anyone else bring a similar dish to the table.  Now you're in the know!


Mandarin Orange Coffee Cake
350F, 40-45 minutes in a 9x9 square pan, greased and floured
(I use the wrapper from the stick of butter and rub it all over the inside of the pan to grease it.)

2 15oz cans mandarin oranges, drained (in light syrup or in juice recommended)
2 c all purpose flour
1 c sugar
1/2 c butter (1 stick, salted)
2-1/2 t baking powder
1 t salt (I like kosher sea salt, reduce to 3/4 t if using regular iodized table salt)
3/4 c milk
1 t vanilla
1 large egg
1 t cinnamon, divided
1/2 t nutmeg

Combine flour and sugar, cut in butter.  Reserve 1/2-3/4 cup of these crumbs for topping.  To remainder of flour mix add baking powder, salt, and 1/2 t cinnamon.  Mix together wet ingredients and combine with dry.  Blend/stir until light and smooth.

Spread in greased and floured pan and top with mandarin oranges in rows, try to think of how you'll be cutting the cake and line them up appropriately.  You might have some leftover oranges (you're welcome).


To the reserved crumbs, add 1/2 t cinnamon and nutmeg and sprinkle on top of oranges.

Bake at 350F for 40-45 minutes, or until toothpick inserted in the middle comes out clean.  Serve hot or cooled.  Makes 9-12 slices, depending on how you cut.

I love having serving dishes that match up to my baking dishes.  I bought this square one just for my 9" square baking pan.  It always looks so pretty to fill it with matching goodies!  I even store them together in the same cabinet and pull them out at the same time when I bake.


Wednesday, April 4, 2012

Favorite Pilaf

I love pilaf. I happily credit my Grandma Rose for this love affair. She made hers from scratch; this is as close as I have ever tasted from a mix.

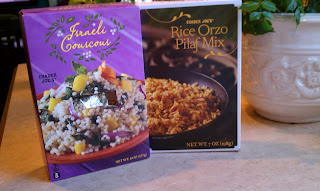
Start with Trader Joe's Rice Orzo Pilaf Mix and add a 1/4 c Israeli Couscous.
Increase water to 2-1/3 c. otherwise, prepare as directed.

This makes an excellent side for chicken, steak, salmon... yeah, anything really. Tonight it's fish sticks.  One pot, 25 minutes, tah-dah! Dinner!

Hope you enjoy as much as we do.  And ask your Grandmothers and Aunts and dear ones for their recipes. You'll miss more than hearing their voice when they're gone.

Friday, March 2, 2012

Fun with Dr. Seuss

It is our dear Dr. Thodore Seuss Geisel's birthday and Alex's school celebrated with a week of fun activities!  I joined in the fun... call it a perfect storm of my love of feeding people, and my love of all things Seuss.

We made Green Eggs and (Bacon)... if anyone has a suggestion for the ham, without having to mold chocolate or play with marzipan, please chime in.  I thought about spray food coloring Bugles, but they still weren't quite right.  And these are just TOO cute (and easy)!  Melted white chocolate, green mini M&M's, and small stick pretzels.


Then, for One Fish, Two Fish, Red Fish, Blue Fish - snack cups with Sweedish Fish on top.  Super easy and lots of fun.  Alex got to help stir the gelatin and put the fish on top.  I used Glad Press and Seal over each cup and transported them in 12-muffin tins with a small cookie sheet between each layer, in an insulated grocery sack.  Ice pack on top, zip-top baggie full of spoons... worked like a charm.

For 24 Red Fish Cups:
24 10oz clear plastic cups
1 8oz package Sweedish Fish
6 3oz package Berry Blue gelatin dessert, prepared as directed.
1/2 c measuring cup (for dispensing into cups)


Did you know that Dr. Theodore Seuss Geisel was married to Helen Palmer (A Fish Out of Water)?  And that they worked together with P.D. Eastman on the book Go Dog, Go!  Amazing to think of that think-tank of children's authors!

Now, go read a book!

Tuesday, February 14, 2012

Chocolate Mousse

Is there anything better than chocolate cake with a thick, creamy layer of chocolate mousse?  I think not.  Costco does a smashing job of it, but they have limited designs.  My Alex wanted a rocket for his 6th birthday.  Not just a rocket decoration, a cake the shape of a rocket.  And I would not disappoint.  I considered buying one, completely devoid of decoration, shaping it and trying to put it back together.  Yeah.  You can see the possibility for disaster there too, 'eh?

So I'll make one all myself!  Thankfully, I have some cake decorating skills (thanks Mom).  I can do this.

After some scrounging on the web, I merged a couple recipes and came up with this.  So. Amazing.  I could have licked the bowl right then and there.  Unabashedly.  Really.  Stan laughed at me, almost giving myself a stomach ache snacking on it one spoon at a time the whole while I put the cake together.  Did I say A-mazing?!  Easy too!

Chocolate Mousse
1 c heavy whipping cream or RichWhip, thawed (in the freezer section)
1 c milk (I used Lactaid 2%)
1 5.9oz package instant chocolate pudding
1 t vanilla

Combine all, whip until peaks form (but stop before it goes into butter stage).

Tah Dah!  Spread between your cake layers, liberally.  Stick your face in the bowl and consume directly... mmm...

I think you could even use the all powerful ice cream scoop and portion it out to a bunch of little desert cups. Little sprig of mint on top and you'll look like a pro.  I can't stress enough the beauty of a simple scoop. Of anything.

I used dark chocolate cake and dark chocolate frosting and let Alex decorate with an assortment of candies.  I think it looks great and it was SUPER yummy.  So much so that all the adults had a piece and all we had was a little sliver leftover.  Sad, but in a good way.

Wednesday, January 25, 2012

Sneaky Chocolate Chocolate-Chip Muffins

What's that you ask? Oh, just a grated zucchini... Yup. Zucchini.
I use Aldi's Baker's Choice mix for Chocolate Chocolate-Chip muffins ($1.99), prepared according to directions, adding a shredded medium zucchini (3 for $1.79).
Alex enjoys them in mini-muffin form best. No matter the size, they're always really yummy and really moist, thanks to the zucchini.
.

Thursday, December 22, 2011

A Perfect Star

You can make a perfect star with only one cut.  Really!  Check out this link (bonus history lesson provided free-of-charge)!

I'm going to use it to make some lovely ornaments out of recycled (Trader Joe's) brown paper bags and Aleene's glue using the burnt brown paper bag method and some rubber stamps.  I've done it before and it works like a charm.  So easy and pretty quick too if you spread out the steps.  For best results make sure you're working with a candle (the soot helps the project like a lighter can't), and in a WELL ventilated area.

from: the vintage pearl

Monday, November 28, 2011

Chai Spice Cookies

I found this recipe in a hand-me-down issue of Better Homes and Gardens.  How could you possibly go wrong with chai spice tea and molasses?!  

I followed the recipe exactly the first time (stars) but just can't rationalize cut-out cookies in my schedule.  Pretty? Sure! Tastes just the same? Yup. 

So instead of rolling the dough, I made them like my Great-Grandma's refrigerator cookies and voila - my absolute favorite go-to cookie. 

Chai Spice Cookies
Prep: 25 minutes
Chill: 3 hours-3 weeks (or freeze)
Makes: 48 2" cookies
Bake: 10 minutes
Oven: 350° F

2 spiced chai-flavor tea bags, like Stash's Chai Green... mmm
3 cups all-purpose flour
2 tsp. pumpkin pie spice
(or 1/4 t clove, 1/4 t allspice, 1/2 t ginger, 1 t cinnamon)

1-1/2 cups salted butter, softened
1 cup granulated sugar
2 egg yolks
2 T molasses

1 recipe Powdered Sugar Icing (below)

In large bowl, whisk together flour, pumpkin pie spice and contents of tea bags, set aside.  The flour mix alone is intoxicating!

In Cuisinart (or large mixing bowl) combine remaining ingredients and beat until light and a little bit fluffy.  Add to flour (I usually end up mixing with my hands until I can create a ball of dough to work with.) Divide dough in half.   

Here's where I divert from the recipe. Roll each half of the dough into a long cylinder, about 2" diameter and wrap it up in parchment, then plastic wrap, and stow it in the fridge 3 hours, or a couple weeks.
When ready to bake, unroll the parchment and cut off enough to line your cookie sheet.  Then cut 1/4" slices of the dough and make round cookies.  Bake 10 minutes, remove to a rack to cool.  Drizzle in crazy pattern with icing.  They're beautiful (super yummy) and everyone marvels that I can have cookies ready at the drop of a hat!  

Powdered Sugar Icing: In medium bowl combine 1-1/2 cups powdered sugar, 1 teaspoon vanilla, and 4 teaspoons milk. Stir in additional milk, 1 teaspoon at a time, until piping consistency.

to store: Layer cookies between waxed paper in covered airtight container. Store at room temperature up to 3 days or freeze up to 3 months.


Updated: 12/12/10 (after making 7 consecutive batches in a Christmas baking marathon)